![]()
![]()
![]()
![]()
![]()
![]()
![]()
![]()
![]()
![]()
![]()
![]()
![]()
![]()
![]()
![]()
Home Energy ChecklistReduce Your Energy Costs
|
|||||||||||||||||||||||||||||||||||||||||||||||||||||||||||||||||||||||||||||||||||||||||||||||||||||||||||||||||||||||||||||||||||||||||||||||||||||||||||||||||||||||||||||||||||||||||||||||||||||||||||||||||||||||||||||||||||||||||||||||||||||||||||||||||||||||||||||||||||||||||||||||||||||||||||||||||||||||||||||||||||||||||||||||||||||||||||||||||||||||||||||||||||||||||||||||||||||||||||||||||||||||||||||||||
| Tightening and Insulating |
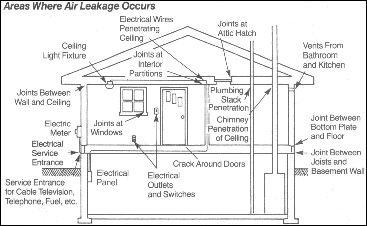
STRATEGY: Your home should be sealed and then insulated. Air leakage usually amounts to 30-40% of your heating bill. Stopping air leakage is not only important for energy savings and comfort, but also to protect your home from the damaging effects of moisture. Air leaking into the walls from the interior of the home carries humidity with it. This can cause condensation. The condensation gets the insulation wet and could eventually cause the surrounding wood to rot.
MYTHS ABOUT AIR LEAKAGE
| MYTH: Window and doors are
the largest source of heat loss in the home and replacing old leaky windows with new
energy efficient ones will yield tremendous energy savings. FACT: Only about 15% of air leakage is through windows and doors, and if a single-glazed window with a storm is replaced with a double-glazed window, the conduction losses have not been lowered at all. The largest sources of air leakage are often overlooked. These include the band joist area at the top of the foundation, and holes into the attic. There are many good reasons to replace your windows: if they are structurally unsound, or to improve appearance, for ease of use or cleaning. But the cost of new windows is usually so high that it is difficult to justify their replacement on energy savings alone. MYTH: Caulking
around the outside of the house makes a house as tight as you can get it. MYTH: Stuffing fiberglass insulation into
cracks will stop air infiltration. |
MYTHS ABOUT INSULATION
| MYTH: Heat rises, so if your
attic is well insulated, your home is well I insulated. FACT: Heat is lost in relation to the level of insulation, not the direction. The attic is often the easiest to insulate and therefore is usually done first. To be adequately insulated, a home must also have the walls and basement insulated. MYTH: Since your basement isn't heated and dirt is
a good insulator, you don't need to worry about insulating your basement walls. MYTH: Adding new siding, especially siding
with a 1/2 inch of insulation behind it, will result in significant energy savings. |
ATTIC:
|
|
Weatherstrip attic access door. |
|
|
Insulate attic access door by attaching foam insulation or fiberglass batt to the back. |
|
|
Caulk electrical wire penetrations at the top of the interior walls and wires into ceiling fixtures. |
|
|
Seal around the plumbing stack(s). |
|
|
Seal around the chimney using a high temperature sealant such as muffler cement and metal flashing where necessary. |
|
|
Caulk along the tops of interior walls where the top plate meets the plaster or drywall. |
|
|
Seal all other holes between the heated space and the attic. |
|
|
Insulate the attic to R-40. If it is over R-30, go on to other items before adding additional insulation. |
MAIN LEVEL:
|
|
Install foam gaskets on all outlets and switches, even on interior walls, and use child safety plugs backed with gasket punch-outs to keep the cold air from coming in through the sockets. |
|
|
If you have a room air conditioner, remove it for the winter or seal it up and insulate it. Water heater insulation jackets can work well for covering the interior. |
|
|
Replace broken glass and loose putty on window glazing. |
|
 |
||||||||
|
|
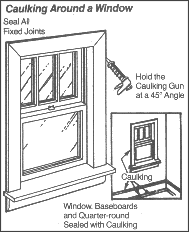
Seal the top half of your double hung windows with a clear sealant after you've weatherstripped the middle section. |
|
|
Install plastic over inside of windows. If you desire something more permanent than plastic, install interior storm windows. |
|
|
Caulk along baseboard (including interior walls) with a clear sealant. |
|
|
Cut the ropes and remove the pulleys and install replacement window channels on double hung windows. |
|
|
Replace your old entry door with an insulated door.* |
|
|
Install an insulated window treatment.* |
|
|
Replace your old windows.* |
If you have a fireplace:
|
|
Check to make sure damper is closing tightly. |
|
|
Install tight fitting glass doors and/or make a decorative insulated cover for it. |
|
|
Install a top sealing damper. |
|
|
Provide outside air for combustion. |
BASEMENT:
|
|
Seal the band joist and sill with caulk or foam sealant. |
|
|
Caulk around basement windows. |
|
|
Seal any holes in the foundation wall with caulk or foam sealant. |
|
|
Seal the hole where the bath tub drain comes down and any other plumbing or electrical penetrations into the basement ceiling with caulk or foam sealant. |
|
|
Insulate the band joist. |
|
|
If you have a crawl space, place a layer of plastic on the dirt floor, close any vents, and insulate the walls by hanging fiberglass batts down them and out two feet onto the floor. |
|
|
If you have a floor over an unheated space, such as a tucked-under garage, insulate the space between the floor and the garage to R-20 or greater. |
|
|
Insulate the basement one of the following ways: |
- Interior--build a 2x4 wall, insulate with batt insulation and cover with drywall or paneling.
- Interior--use 2x2 furring strips with 1 1/2 inch rigid foam insulation between and cover with drywall.
- Exterior--install extruded polystyrene or high density fiberglass down from the siding (protect the exposed portion) to one foot below grade (v) and then slope it out away from the house 2-3 feet.
- Exterior--install extruded polystyrene or high density fiberglass down from the siding all the way down to the footings. This method would only be practical if you had to dig up your basement for other reasons, such as water problems.
EXTERIOR:
|
|
Caulk around all penetrations such as electrical, telephone, cable, gas, dryer vents, water faucets, etc. |
|
|
Caulk around window and door frames. |
|
|
Caulk around storm windows where the metal meets the window frame if you have combination storms. If you have wooden storms that must be exchanged for screens in the summer, use rope caulk to seal around the storm. |
|
|
Install storm windows on all single-glazed windows. |
|
|
Install a storm door where you have none. |
|
|
If you have an exposed slab-on-grade, dig down a couple of feet and install extruded polystyrene down from the siding. |
|
|
If you are re-siding, consider adding 3/4" to 1 1/2" of rigid foam insulation and wrap the home with an air barrier (vapor permeable) material. Make sure the house walls are insulated before re-siding. |
< return to top >
| Heating System |
STRATEGY: If your heating bills are high, your first thought might be to put in a new high efficiency furnace. But your first step should be to tighten up the house and adequately insulate it. Then consider furnace replacement. If you install the furnace and then make other energy improvements, the furnace will be oversized and might not operate properly or at peak efficiency. By making other improvements first, you may be able to reduce your furnace size. After making improvements, the 90% + efficiency furnace may no longer be your best investment because your heating demand is much lower. The lower your heating demand, the more the 75-85% efficient furnace tends to be a better investment. When replacing a furnace in a tight house, it is recommended that you install one with an induced draft fan or sealed combustion using only outside air.
MYTHS ABOUT HEATING:
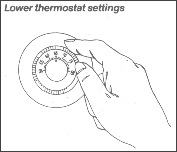
| MYTH: If you turn down your
thermostat at night or when you are gone, you will use more energy to warm up the house
again than what you saved. FACT: You always save by turning down your thermostat no matter how long you will be gone. The one exception is an electric heat pump. When you turn it up in the morning, the electric back-up elements kick on to bring the house up to temperature faster. You can purchase a special setback thermostat that compensates for this and will provide savings. MYTH: You should
leave your pilot light burning during the summer to keep moisture from accumulating in
your heat exchanger and rusting it out. MYTH: You can warm up the house faster if
you turn the thermostat up to 75-80 degrees initially. MYTH: Installing a ceiling fan on an eight
foot ceiling will keep warm air from accumulating near the ceiling and save considerable
energy. |
HEATING TIPS:
|
|
Use bath and kitchen vents sparingly when moisture and odors are not a problem. |
|
|
Lock your windows so they will seal tighter. |
|
|
Try to use doors that are protected from the wind. |
|
|
Be sure thermostat is located away from heat sources and cold drafts. |
|
|
Close drapes at night and on cloudy days. |
OPERATIONAL TIPS:
|
 |
IMPROVING YOUR EXISTING FURNACE:
|
|
Insulate pipes and ducts in unheated areas. |
|
|
Install an auto setback thermostat if you have trouble remembering to turn down your thermostat or want the house to be warm when you get up in the morning and when you return from work. (If you turn it down manually now, you won't save energy, but you will add convenience.) |
|
|
Install a vent damper. (If your water heater uses the same chimney for venting, you need to install one on it also.) Install a modulating aquastat on a boiler to adjust its temperature according to outdoor temperature. |
|
|
Tape all the joints in the ductwork.* |
|
|
Install an electronic ignition.* |
|
|
Install a heat reclaimer.* |
|
|
Install an induced draft attachment if there is a potential for flue gases to come back down the chimney.* |
|
|
Install outside air for combustion if your house is extremely tight.* |
INSTALLING A NEW FURNACE:
|
|
Install a new medium-to-high efficiency furnace. The efficiency is measured in AFUE (Annual Fuel Utilization Efficiency). Replacement should be considered only after the house has been tightened up and fully insulated. |
< return to top >
| Air Conditioning |
STRATEGY: The best approach to take in staying cool for the summer is to keep the heat out with house tightening insulation, and window shading; refer to Tightening and Insulating. Next try to avoid heat producing tasks inside your home. If it is still too warm to tolerate, try some of the air conditioning alternatives offered below. If you must resort to the air conditioner, follow the operating tips below for most efficient operation. Finally, if you use your air conditioner extensively, it may pay to replace it with a more efficient model.
MYTHS ABOUT AIR CONDITIONING:
| MYTH: It's more efficient to
leave the air conditioner running than to shut it off and have to re-cool the house later. FACT: You begin saving as soon as you shut off your air conditioner. If your house is tight and well insulated, it may stay cool all day. This will only work if you keep your house closed up all day. Opening the windows not only heats up the house, but also allows the humidity back in that your air conditioner worked so hard to remove. The exception to keeping windows closed is at night when it is cool outside. |
COOLING TIPS:
|
|
Wear lightweight, light colored clothing made of natural fibers. It will reflect heat and absorb perspiration, making you feel cooler. |
|
|
Drink plenty of liquids. |
|
|
Plan cold meals with cold cuts, salads, etc. |
|
|
If you are going to cook, use appliances that don't produce much heat such as microwaves, crock pots, frying pans, etc. Or enjoy the outdoors and barbecue. |
|
|
Schedule heat-producing tasks for the early morning or late evening instead of during the hottest part of the day. |
|
|
Turn off unnecessary lights and appliances. |
|
|
Keep both primary and storm windows shut when closing up the house for the day or when running the air conditioner. |
|
|
Close your drapes on hot sunny days, especially the east and west drapes. If there is some way to shade your windows on the outside this will keep out even more heat. |
|
|
Try to use as little hot water as possible. It adds heat and humidity. |
|
|
Use bath and kitchen vents to exhaust heat and moisture. |
|
|
Make sure your clothes dryer is vented outdoors. You don't need the heat or humidity inside the house. Or use your "solar clothes dryer," the clothesline. |
|
|
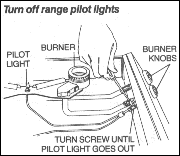
Turn off the pilot light on your furnace. This saves gas and heat. Ask a dealer how to turn off and relight pilot lights. Pilot lights on most gas appliances such as stoves and dryers also contribute to the cooling load. Shut off unnecessary pilot lights and light by hand when needed. |
|
|
Install reflective window films or solar screens on unshaded east and west windows. (Cost effective only if you run your air conditioner extensively, otherwise it's a comfort issue). |
AIR CONDITIONING ALTERNATIVES:
|
|
Open your windows in the evening to capture the cool breezes and close them early in the morning on hot days. If your home is tight and well insulated, it may stay cool all day. |
|
|
If your basement is livable temporarily move downstairs on hot summer days. It is often 10-15 degrees cooler than the upstairs. |
|
|
Use fans whenever possible. |
|
|
Install a whole house fan (only works if it is cooler outside than inside) and provide a good cover to seal it in the winter. |
|
|
Install a ceiling fan to create air movement. The air movement can keep you cool at a higher temperature, allowing you to avoid running your air conditioner or letting you set the air conditioner temperature higher. |
OPERATIONAL TIPS:
|
|
Set the thermostat at 78 degrees. Each degree higher saves approximately 6 percent on air conditioning costs. |
|
|
Don't turn the thermostat lower than the desired setting. The house will not cool off any faster and can overshoot the desired temperature, wasting energy. |
|
|
If the house is unoccupied during the day, you will save energy and money if you turn off your air conditioner and leave your house closed up. It may stay cool all day. If not, and you don't like coming home to a warm house, purchase a clock thermostat to turn on the air conditioner in time to have the home cool when you arrive. |
|
|
Don't run your air conditioner all night if it is cooler outside than inside. Open the windows and use the fan. |
|
|
Turn off the air conditioner if you're leaving the home for more than an hour. |
|
|
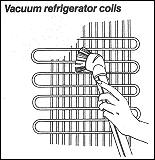
Keep grills and heat exchangers clean and filters frequently changed. |
|
|
Clean the unit before each cooling season (See manufacturer's instructions). |
|
|
Shade the outside compressor unit but don't block the air circulation. |
INSTALLING A NEW AIR CONDITIONER:
|
|
Install a new medium to high efficiency air conditioner. Efficiency is measured in SEER (Seasonal Energy Efficiency Ratio or Btu/watt). The higher the SEER the more efficient the air conditioner. |
< return to top >
| Water Heating System |
STRATEGY: Two steps to reducing water heating costs: first, cut your hot water consumption and second, your standby losses from the water heater tank when not in use.
| MYTH: Rinsing clothes or
dishes in warm water gets them cleaner. FACT: Rinsing in warm water, even hot water, won't get your clothes or dishes any cleaner. |
REDUCING CONSUMPTION:
|
|
Don't run water unnecessarily. |
|
|
Repair leaky faucets promptly. |
|
|
Wash only full loads of laundry and dishes. |
|
|
Always use cold water for the garbage disposal. |
|
|
Use a cold water laundry detergent and always rinse in cold. |
|
|
Install flow restrictors in lavatories and showers or water saving showerheads for showers. |
REDUCING STANDBY LOSSES:
|
 |
|
|
Set an electric water heater on 1 inch of extruded polystyrene foam insulation. Most electric water heaters have no insulation on the bottom. |
|
|
Install a heat trap on both the hot and cold water lines if moving or installing a new water heater. |
|
|
Add a booster heater to your dishwasher so you can turn your water heater temperature down. |
INSTALLING A NEW WATER HEATER:
|
|
Replace an old water heater with a newer more efficient one. |
|
|
Install a passive or active solar water heating system.* |
< return to top >
| Appliances |
STRATEGY: Use the following tips to operate your appliances wisely. If your electric bills seem extraordinarily high, contact your local utility to see if they have a meter you can borrow to check the consumption of your appliances You may find some older appliances consuming higher than normal amounts of electricity. Replacing them with new more efficient appliances is your next step.
REFRIGERATOR/FREEZER:
Refrigerators account for the largest portion of appliance energy consumption. Replacing an older refrigerator with a new energy efficient model could cut your operating costs in half. An inefficient refrigerator also adds a considerable amount of heat to your kitchen in the summer.
Operating Tips:
|
 |
|
|
Keep liquids tightly covered or evaporation will cause frost to build up. |
|
|
Turn on the energy saver switch unless moisture begins to condense on the refrigerator. |
|
|
If you have a manual defrost model, don't let frost build up more than 1/4 inch. |
|
|
Replace gaskets that don't seal tightly. |
|
|
If your refrigerator or freezer will not be used for a long period, clean it out, unplug it and leave the door open. |
|
|
Don't run a second refrigerator or freezer if not essential. |
Refrigerator Buying Tips:
|
|
Compare "EnergyGuide" labels for operating costs. |
|
|
Frost-free units consume almost twice as much energy as manual defrost models, but only if you keep the manual unit defrosted. If you buy a frost free refrigerator, select one with an energy saver option. |
|
|
The larger the capacity, the more it costs to keep the same amount of food cold. The size needed depends on family size, shopping habits, family members' ages and eating habits. |
|
|
Side-by-side units generally consume more energy than refrigerators with the freezer on the top or bottom. |
Freezer Buying Tips:
|
|
Compare "EnergyGuide" labels for operating costs. |
|
|
Chest freezers are more energy efficient than upright models, since they don't lose as much cold air when you open the door. |
|
|
Don't buy a larger freezer than your family needs. Do you prepare food in advance? Have a garden? Buy large supplies of seasonal fresh food? Entertain frequently? These factors should be considered. |
RANGE:
| Pilot lights on a gas range can consume
up to 50% of the annual energy consumption of the range. You may want to try lighting the
burners by hand, especially in the summer when the pilot lights add unwanted heat into the
kitchen.
Operating Tips:
|
 |
|
|
Use the microwave when warming foods up. |
|
|
Thaw frozen foods in the refrigerator overnight before cooking them. |
|
|
Place the pan on the burner before turning the burner on. |
|
|
Match pan size to burner size, and cover pans with lids whenever possible. |
|
|
Use pressure cookers when possible. |
|
|
Use only the minimum amount of heat and water needed to cook your food. |
|
|
Don't boil water for six cups of coffee if you only plan to drink two. |
Buying Tips:
|
|
Glass top units are less efficient than surface elements. |
|
|
If you are selecting a gas range, buy one with an electronic ignition. |
OVEN:
Operating Tips:
|
|
Don't use the oven for small cooking jobs. |
|
|
Rearrange oven shelves before preheating the oven. |
|
|
Thaw frozen foods in the refrigerator before cooking. |
|
|
Cook several foods in the oven at the same time if possible. |
|
|
Lower the oven temperature by 25degrees when baking with glass or ceramic dishes. |
|
|
Most foods don't need a preheated oven. |
|
|
Avoid peeking; the oven temperature lowers up to 25 degrees each time you open the door. |
|
|
Turn the oven off a few minutes early and use retained heat to finish cooking. |
|
|
Use the self-cleaning feature when the oven is already hot from previous use. |
|
|
Replace oven door seal if it leaks heat. |
|
|
Never use the oven to heat the kitchen. |
Buying Tips:
|
|
The most energy efficient units are the self-cleaning types. They have more insulation than other models. |
|
|
Ovens with windows save energy by reducing peeking, but the smaller the window the better. |
MICROWAVE OVEN:
Operating Tips:
|
|
Use the microwave for single dishes and warming things up. For large quantities or several dishes use the oven or range. |
|
|
Use the range for high liquid foods over four cups. |
|
|
Defrost foods in the refrigerator overnight when possible instead of using the microwave. |
DISHWASHER:
Operating Tips:
|
|
Scrape the dishes before placing them in the dishwasher so you can use the shortest cycle possible to clean the dishes. |
|
|
Clean the filter screen over the drain regularly. |
|
|
Don't use the rinse and hold cycle. |
|
|
Run only full loads. |
|
|
If you don't have a booster heater on your dishwasher, turn your water heater temperature down as low as possible while still getting your dishes clean. |
|
|
Open the door and allow the dishes to dry naturally instead of using the dishwasher's drying cycle. |
|
|
In the summer, use the dishwasher early in the morning or late in the evening when it's cooler outside. |
Buying Tips:
|
|
Compare "EnergyGuide" labels for operating costs. |
|
|
Compare water usage when shopping for a dishwasher. |
|
|
Buy a unit with an air dry and a short cycle selector. |
|
|
Select one that has a booster heater so you can turn the water heater temperature down. |
WASHER:
Operating Tips:
|
|
Wash in warm or cold water and always rinse in cold. Rinsing in warm or hot water doesn't get your clothes any cleaner. |
|
|
Select the water level to match the load size or wash only full loads. |
|
|
Don't over wash clothes. Use short cycles for lightly soiled and delicate clothes. |
Buying Tips:
|
|
Compare "EnergyGuide" labels for operating costs. |
|
|
Select a model with a variety of settings for water level and temperature, including a cold rinse option. |
|
|
Compare models for water usage |
|
|
Look for a suds saver feature and install a suds saving tank so you can wash several loads of lightly soiled clothes with the same water. |
DRYER:
Operating Tips:
|
|
Clean the lint filter after every load. |
|
|
Dry similar fabrics together. |
|
|
Don't overload, but dry full loads. |
|
|
Don't over dry your clothes. |
|
|
Plan washing and drying so the dryer can be reloaded while it is still warm. |
|
|
Dry clothes outside whenever possible. |
|
|
Install a diverter on an electric dryer to vent the warm exhaust into the home in the winter if humidity is not a problem. This diverter should not vent near the dryer or the furnace. Never vent a gas dryer into the house, its exhaust contains harmful products of combustion. |
|
|
Add an electronic ignition to a gas dryer.* |
Buying Tips:
|
|
Choose a dryer with a variety of settings for different fabrics. |
|
|
It should have an easy to reach lint filter. |
|
|
Select a dryer with a moisture sensor that will shut it off when the clothes are dry. |
|
|
If purchasing a gas dryer, select one with an electronic ignition. |
|
|
Gas dryers cost considerably less to operate than electric dryers, but you lose the benefit of venting into the house in the winter. |
WATERBED:
Operating Tips:
|
|
Keep the bed covered during the day. |
|
|
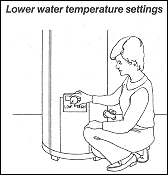
Use a mattress pad so you can get by with a lower water temperature. |
|
|
Insulate under and around the sides of your waterbed mattress with 1 inch extruded polystyrene. |
< return to top >
| Lighting |
STRATEGY: To save on lighting costs, first make use of natural light whenever possible, and make sure lights are turned off when not in use. Then lower lighting levels where they are higher than necessary by replacing some bulbs with lower wattage bulbs, or replacing some bulbs in multi-bulb fixtures with burned out bulbs. Bulbs and fixtures can also be replaced with higher efficiency ones.
MYTHS ABOUT LIGHTING:
| MYTH: You save the most
energy by leaving fluorescent lights on. FACT: Fluorescent lights use very little energy when turned on and the wear on the bulb is small. They should be shut off whenever they are not needed. |
OPERATIONAL TIPS:
|
|
Make use of natural light as much as possible. |
|
|
Turn off lights when not in use, even if you are out of the room for a few minutes. |
|
|
Use lower wattage bulbs in fixtures where you don't need much light, such as hallways and bedrooms. |
|
|
Where possible, use one higher wattage bulb instead of several lower watt bulbs. However, don't use a higher watt bulb than the fixture will allow. A 100 watt bulb gives off 20% more light than two 60 watt bulbs. |
|
|
Don't use "long-life" bulbs unless they are in a position that makes replacement very difficult. They are less efficient. |
|
|
Dust your light bulbs periodically. Dusty bulbs can emit 20% less light |
|
|
Install special high efficiency bulbs in lamps. They can be up to 3 times as efficient as ordinary incandescent bulbs. |
|
|
Use fluorescent fixtures and bulbs wherever possible. They use 1/4 the energy of an incandescent bulb for the same amount of light, and last 10 times as long. |
|
|
Install solid state dimmer switches on incandescent fixtures. |
|
|
Purchase lamps and fixtures so you can light the area you're working in without lighting the whole room. |
|
|
When redecorating use light colors to reflect more light. |
< return to top >
_____________________
ColoradoENERGY.org would like to thank the Iowa
Energy Bureau, Iowa Department
of Natural Resources for allowing us to reprint this publication on
ColoradoENERGY.org.
|
Hot Issues | Tips & Information | Communications Center Calendar of Events | Colorado Activities | Energy Directory | Energy Data Laws/Legislation | Professionals Corner | Job Announcements Other Sites | About COenergy | Search | Home © 2000-2013 ColoradoENERGY.org This site is currently maintained and hosted by Randy L. Martin of R. L. Martin & Associates, Inc. Comments on the site and notification of items that could be included can be sent to: email Last Updated: 01/21/2007 |